Few years back the STM32F103C8 entered the territory of DIY enthusiasts but reached its full potential when stepped into the Ardino stage. It has made a reputation for running faster and being more capable than the regular AVR MCUs. Comes packed in a LQFP48 package that's soldered on a small board outputing most of the chip pins. It also sports a micro-USB port and allows boot sequence selection through the yellow jumpers. Can be powered from as low as 2 volts and it accepts 5 volt signals on most inputs. All that for a price just shy of 2 dollars.
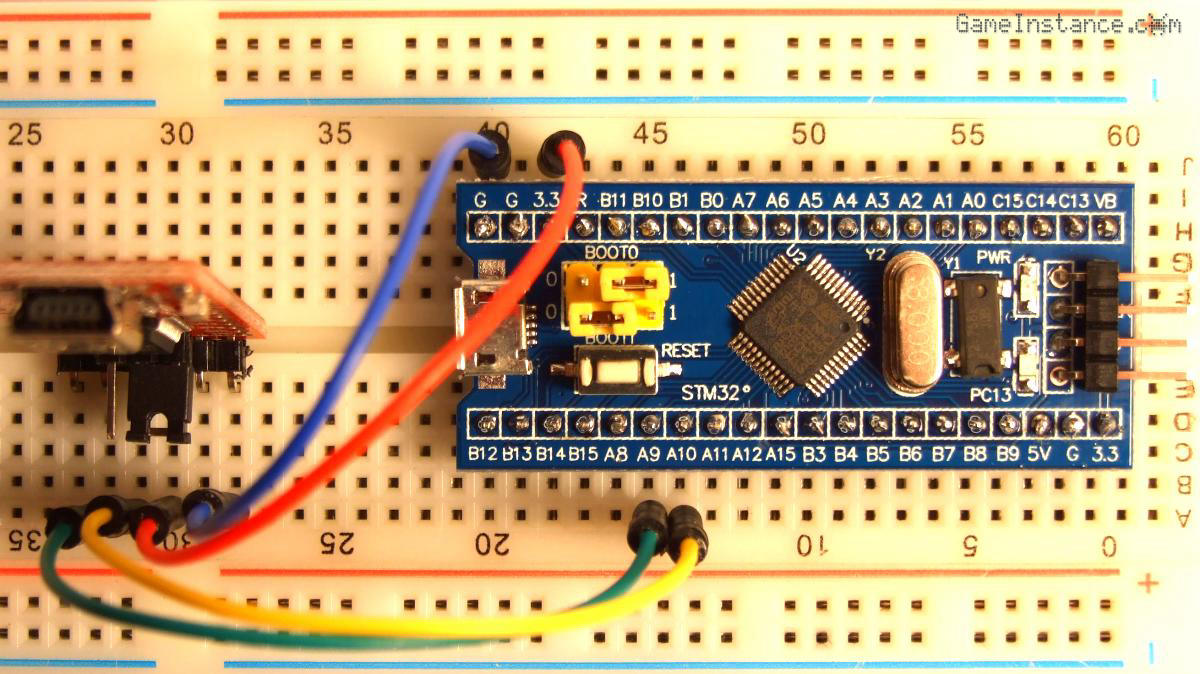 STM32F103C8 and the FTDI232 serial programmer; observe the programming mode BOOT0 jumper position
Feats of strength
Here're some measurable facts about STM32F103C8, ATmega328 and the ATmega2560:
| # | Characteristic | STM32F103C8 | ATmega328 | ATmega2560 |
|---|---|---|---|---|
| 1 | CPU clock [MHz] | 72 | 16 | 16 |
| 2 | Flash [KB] | 64 / 128 | 32 | 256 |
| 3 | RAM [KB] | 20 | 2 | 8 |
| 4 | ADC channels | 10 | 8 | 16 |
| 5 | ADC resolution [bits] | 12 | 10 | 10 |
| 6 | ADC sampling frequency [KHz] | 1000 | 10 / 15.38 max | 15 |
| 7 | PWM channels | 20 | 6 | 15 |
| 8 | SPI | 2 | 2 | 5 |
| 9 | I2C | 2 | 1 | 1 |
| 10 | USB | 1 | 0 | 0 |
By almost all counts, the STM32 is better. Let's give it a try, shall we?
Programing the STM32
isn't actually that hard. The only hardware needed is a USB UART serial adapter, I use FTDI232 but CP2102 or equivalents would do just fine. For the purpose of this article, it will be called serial programmer, or uC2 in the figure below.
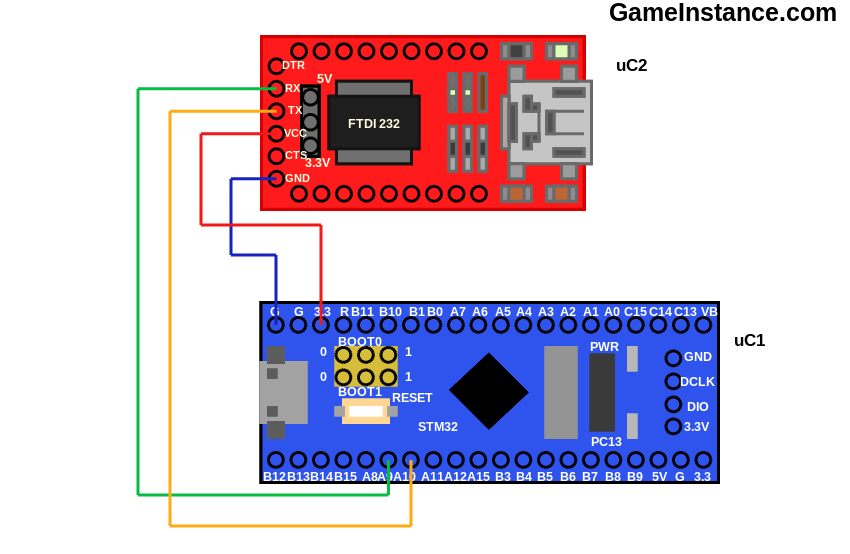 STM32F103C8 and FTDI232 serial programmer - connection schematics
The STM32 can boot either from User Flash, System Memory or embedded SRAM but to be able to write your program on it, the BOOT0 jumper must be moved to 1 and the BOOT1 kept unchanged, to 0. Once the transfer is complete, the MCU will continue with the execution of your program until powered off or reset. To be able to run your application after that, you'll need to move back the BOOT0 jumper to 0.
Arduino IDE
is a bit of two worlds. It offers a minimal C/C++ code editor and various ways of writing binaries to your devices. That successful mix of features gets you up-and-running in no time.
Having said that, the Arduino IDE setup does not support these MCUs of-the-box. You'll have to download it from Roger Clark's GitHub repository and place it in the hardware folder of your Arduino install path.
Step-by-step configuration
1. Configure and connect your hardware:
* On the FTDI232 serial programmer (uC2) move the power jumper to 3.3V.
* On the STM32 board (uC1) move the BOOT0 jumper to 1.
* Connect your STM32 board (uC1) with the FTDI232 serial programmer (uC2):
STM32 board to FTDI serial programmer
3.3V -------------- VCC
G -------------- GND
A9 -------------- TX
A10 -------------- RX
2. Prepare your Arduino IDE:
* Download Arduino_STM32 and extract the folder in <PATH_TO>/Arduino/hardware/. (Re)start Arduino IDE.
* From Tools -> Board menu select: Generic STM32F103C series
* From Tools -> Variant menu select: STM32F103C8 (20k RAM, 64k Flash)
* From Tools -> Upload method menu select: Serial
* From Tools -> Port menu select: /dev/ttyUSBx for linux or COMx for windows. The serial programmer needs to be connected to your computer.
3. Press the reset button on the STM32 board, wait one second then click Compile and upload on the Arduino IDE. Here's a minimum test code (blink sketch):
 void setup() {
  //
  pinMode(PC13, OUTPUT);
}

void loop() {
  //
  digitalWrite(PC13, HIGH);
  delay(1000);
  digitalWrite(PC13, LOW);
  delay(1000);
}
Should you encounter problems at this last step (I know I did), Google is your friend. Most likely it will be related to the missing or ill configured arm-none-eabi-g++. On debian or its derivatives, the missing package can be installed by writing:
sudo apt-get install gcc-arm-none-eabi
However, the Arduino IDE will look for the g++ compiler in /bin/ and most likely it will be installed in /usr/bin/. To fix that you'll have to replace all instances of /bin with the correct location in the
Update: A more elegant solution to this problem is suggested on the STM32duino forum. You need to download the Arduino SAM Board (32-bits Arm Cortex-M3) from the Adruino IDE Tools -> Boards -> Board Manager and your sketch will compile without a glitch.
If you succeeded all the above steps you can move on to more interesting projects.
Have fun!